

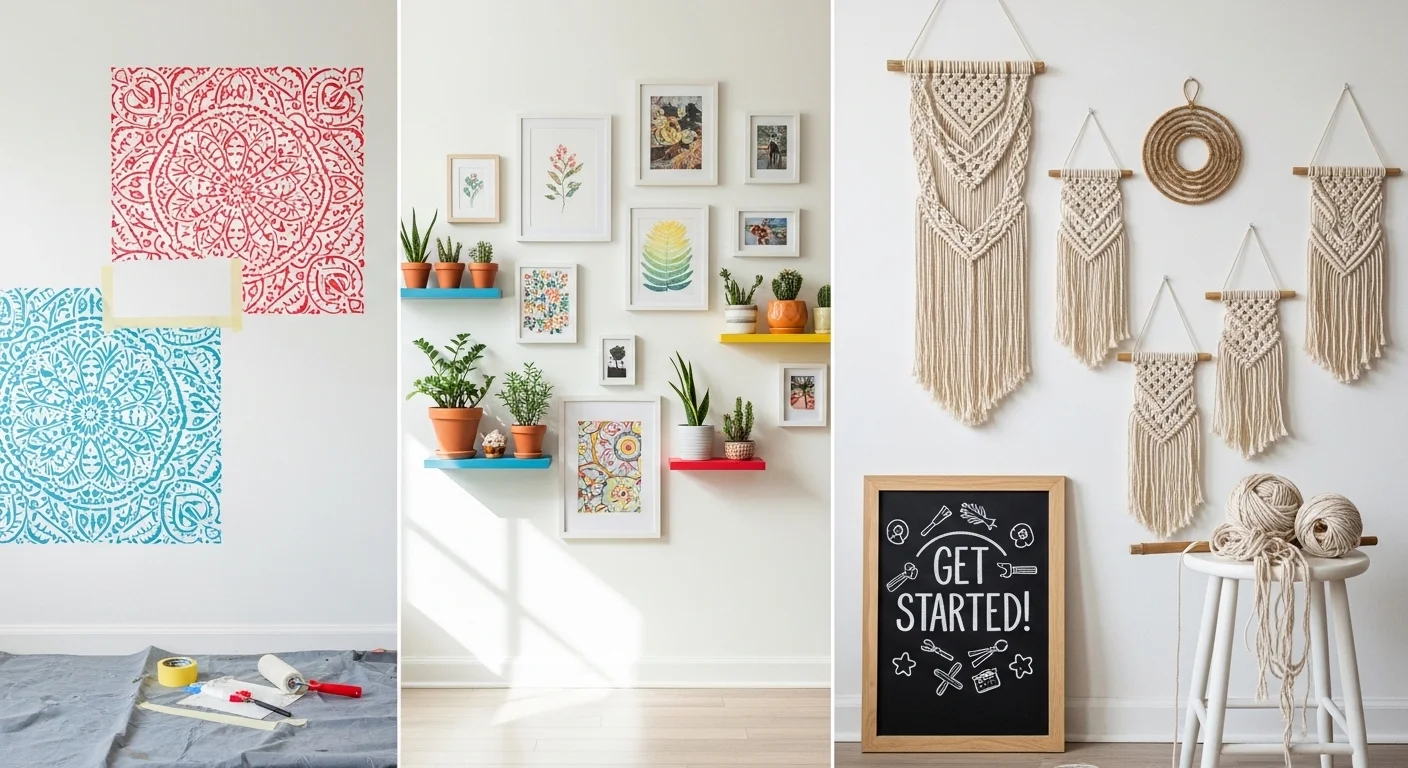
Introduction
Rooms that are blank seem empty and unfinished. They are the ones you look at every day, wishing that they were more beautiful. The positive side is DIY wall decor is simpler than you imagine. It is possible to create beautiful wall décor without spending a lot of money or requiring specific abilities. This guide will help you create simple tasks that anyone can accomplish. Make plans to turn your dull walls into stunning features. Your guests will think you have hired a professional interior designer.
Why Choose DIY Wall Decoration
The process of creating your own wall decor offers many advantages. First of all, it will save you a lot of money. The art you buy from the store could be expensive, costing hundreds. DIY projects are only several dollars in most cases. You will get the same gorgeous outcomes for less.
The second, DIY wall decor lets you design the exact look you desire. There is no need to search to find the perfect item. Make it yourself with the colors you love. It will match your style and decor perfectly each time.
The third reason is that handmade decorations are more personal and significant. They tell your personal story. People always ask about hand-crafted items. It’s a feeling of pride to show off your own creation.
Getting Started With DIY Wall Decoration
Before you begin any project, make sure you have most basic materials. The majority of DIY wall decorations are made using everyday household objects. You likely already have a lot of these items. Here’s the items you’ll need for the majority of projects:
- Scissors, craft knife and scissors
- The glue stick and hot glue gun
- Tape (regular tape, painter’s and double-sided)
- Measurement tape or ruler
- Pencil to mark
- Paint and brushes
- Frames from discount stores
- Boards of canvas or cardboard
Make sure you have a comfortable working space first. Set your table up with old newspaper. Lighting that is well-lit helps you to be able to see the finer details. All supplies should be in reach. This helps make the process more efficient as well as more fun.
Paper-Based DIY Wall Decoration
Paper is a great material for beginning students. It’s affordable accessible, readily available and is easy to use. Making mistakes isn’t expensive with paper-based projects. Try these easy paper decorations ideas:
Paper Flower Wall Art
Create stunning paper flowers that will never fade. Cut flower shapes out of colored papers. Then, glue them with flower forms. Then, glue them to the cardboard backing or canvas. Lay them out in random patterns or clusters.
Flowers can be made in at any size you’d like. The big blooms are striking on walls. Tiny flowers create delicate pretty displays. Mix various colors to create gardens-like effects. This is a simple project that takes just an hour to complete.
Origami Wall Display
Cut colorful paper to create simple origami designs. Hearts or stars as well as cranes are great choices. Create several pieces using similar shades. Join them on the canvas using glue dots.
Make patterns or let shapes disperse naturally. This DIY wall decor looks beautiful and contemporary. Alter the colors according to seasons, if you wish. Children especially enjoy helping with this task.
Paper Cutout Art
Cut out interesting shapes using scrapbook paper that is patterned. Geometric shapes work well for contemporary designs. Stars and hearts complement well in playful spaces. Use different colors for more depth and depth.
Frame your cut-outs of paper under glass to protect them. Attach them directly to painted canvas. The project is almost free to produce. It looks costly and is professionally created.
Fabric and Textile Projects
Fabric provides softness and texture to walls with a beautiful texture. Scraps of fabric leftovers are ideal to make these designs. Check out fabric stores for little remnants that are on sale. Tablecloths and curtains from thrift stores also work well.
Fabric-Wrapped Canvas Boards
Find cheap canvas boards in craft stores. Pick a fabric in colors that you are drawn to. Cut fabric that is larger than your canvas size. Cover it with a tight bandage around the canvas to make an present.
Hot glue or staple fabric to the back. Be sure the front is nice and clean. Create a series using coordinating fabrics. Then hang them up for a dramatic impact.
This DIY wall decor does not require sewing expertise. It takes approximately 15 minutes for each canvas. The end result is like wallpaper. You can change the fabric in season to get new styles at any time.
Embroidery Hoop Art
Hoops for embroidery don’t only serve needlework these days. The fabric can be stretched tightly using various sizes of hoops. Remove excess fabric off the back with care. Hang hoops in a single row or in grouping arrangements.
Mix patterns and solid colors for a balanced look. Use botanical prints to create natural look. Geometric patterns give modern, elegant looks. This design can be used in any space.
Paint-Based DIY Wall Decoration Ideas
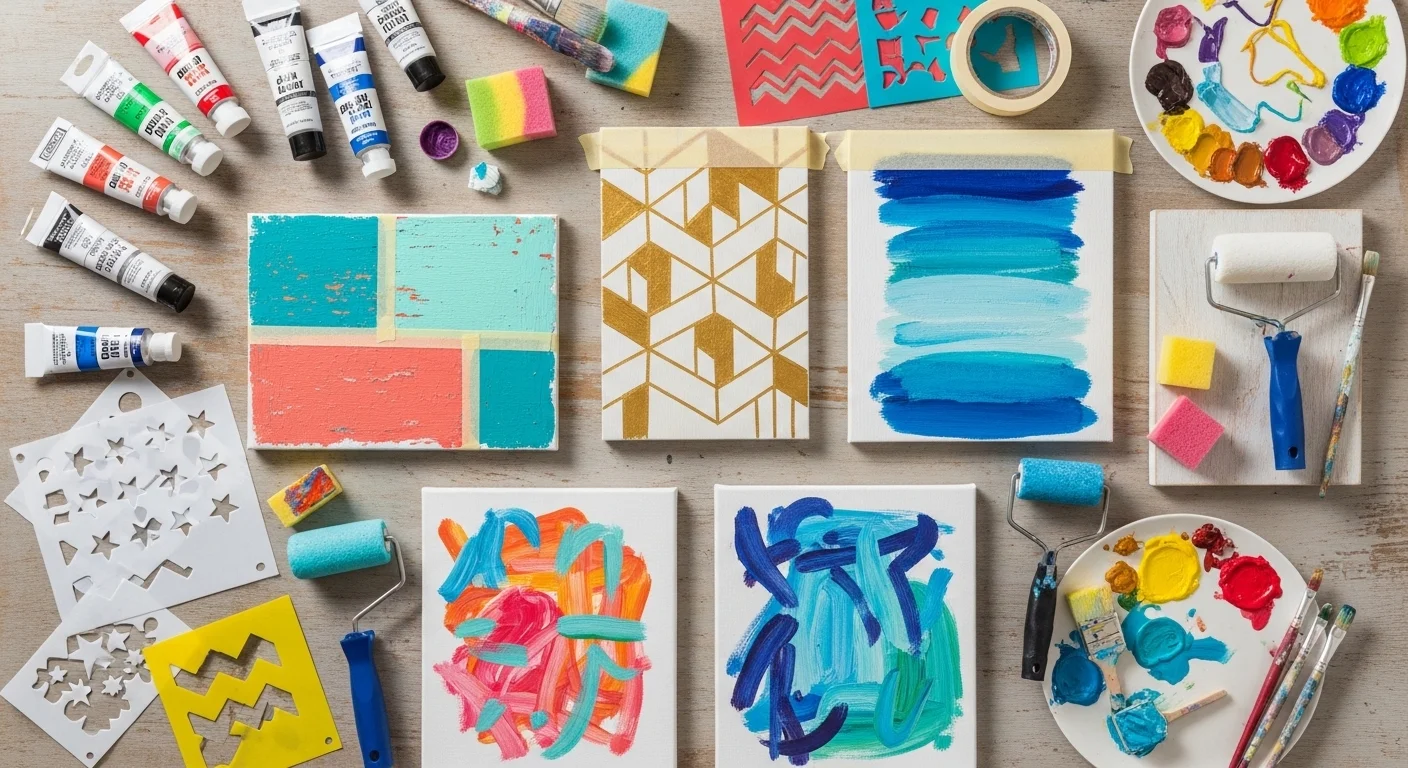
Paint allows you to customize colours to perfection. Make sure to match your existing decor or do something totally different. Do not worry about being creative. These projects require no painting abilities.
Abstract Canvas Painting
Abstract art is a lot of fun and a lot of fun to create. Paint acrylic directly onto canvas. Utilize palette knives to blend and spread. Make swirls, lines or random patterns.
There is an absolute right and wrong in abstracts. Allow your imagination to flow freely without judgement. Choose colors that bring you joy inside. This DIY wall decoration will reflect your style totally.
Ombre Painted Wood Boards
Find wooden boards in craft or hardware stores. Paint them with beautiful ombre color gradients. Begin with dark colors at the lower. Gradually, blend into lighter shades towards the the top.
Set up the boards side by side on the walls. or stack them in tiny gaps between them. This can create modern art installations quickly. The color change looks relaxing and professional.
Stenciled Wall Canvas
Stencils help you paint detailed designs a breeze. Get stencils, or design ones from scratch. Apply stencils securely to the canvas or cardboard. Dab paint into the openings using sponge brushes.
Remove stencils with care when paint is dry. You get crisp clean designs every time. Explore geometric patterns or natural designs. Metallic paints add a glamorous look to stenciled designs.
Nature-Inspired DIY Wall Decoration
Bring nature inside using natural materials. These projects allow you to connect with nature on a daily basis. Many of the materials are available in your backyard or in the park.
Pressed Flower Frames
Take care to collect flowers and leaves during sunny weather. Lay them flat on thick book pages. Allow them to rest for two weeks. Take them out carefully to avoid breaking.
Set the flowers you have pressed on white cardstock with elegance. Frame them with glass for a long-lasting protection. Label the flowers with their names should you want to. This can help to create educational and attractive pieces.
Twig and Branch Art
Find interesting twigs and branches to take outside. Get rid of dirt and allow them to dry. Then arrange them into geometric patterns or shapes. Put them on paper or a cardboard backing.
Leave branches unnatural or spray paint them with spray paint. Silver and gold look elegant. White paint gives contemporary Scandinavian impressions. This DIY wall decor costs nothing.
Pinecone and Acorn Displays
Take acorns and pinecones on autumn walks. Clean them thoroughly and allow them to dry completely. Set them up either in shelves or shadow box. Mix them with other natural materials such as moss.
This will add a rustic and cozy feel to any room. It is ideal for cabins and country-style homes. Kids love collecting materials to make this activity. It’s a great family project.
DIY Wall Decoration Project Comparison
| Project Type | Difficulty | Cost | Time Needed | Materials |
|---|---|---|---|---|
| Paper Flowers | Easy | Very Low | 3-4 hours | Paper, glue, canvas |
| Fabric Canvas | Easy | Low | 30 minutes | Fabric, canvas, stapler |
| Abstract Painting | Medium | Medium | 1-hour | Paint, canvas, tools |
| Pressed Flowers | Easy | Very Low | 15 minutes | Frame, flowers frames, cardstock |
| Twig Art | Easy | Free | 1 hour | Twigs and glue, backing |
String Art Projects
String art is a stunning three-dimensional designs. It appears complicated, but it’s actually quite simple. All you need is strings, nails and a bit of patience. Here’s how you can make string art quickly:
Pick a simple shape, or word. Print it as a pattern. Apply the template to a wooden board securely. Small nails should be hammered across the outline in a careful manner.
Take the template off completely. Secure string around one nail with a secure knot. Wrap strings over nails with random designs. Continue wrapping until you’re satisfied with the thickness. Trim the any excess length.
This DIY wall decoration appears to be store-bought and costly. Select thread colors that go with your interior decor. Hearts are a great choice for bedrooms, obviously. State outline designs show the pride of your hometown wonderfully.
Photo Display Projects
Personal photos are the most beautiful wall decorators. They convey your story more effectively than anything else. Create unique displays beyond standard frames alone.
Clipboard Photo Wall
Put several clipboards up on the wall. Attach different images to each one. Alter photos as often as you like effortlessly. No glass or frames required in any way.
Paint your clipboards in the same colors before. Leave them in unpainted wood tones. This makes for casual and relaxed gallery walls. Great for updating family pictures.
Photo Garland Strings
Ribbon or string on your wall. Attach photos using mini clothespins. This can create charming display ideas that are farmhouse-style. Change photos on a regular basis or during special events.
Use fairy lights to illuminate photographs to create a magical effect. This is great for bedrooms, especially. The relaxed arrangement feels warm and inviting. People love to look at the photos of your life presented.
Washi Tape Wall Designs
Washi tape is the perfect decorator’s companion. The vibrant decorative tape is removed without causing damage. Ideal for renters who are unable to paint their walls. Make temporary designs that can be altered at any time.
Create geometric designs by gluing them directly onto walls hexagonal clusters or triangles frames that outline the art work colorful borders around windows or doors.
Washi tape is available in a variety of designs and colors. Mix multiple designs for playful looks. Use one color to create stylish impressions. This DIY wall decor is very small amounts of money.
Macrame Wall Hangings
Macrame can add boho style to any room. Basic knots can create stunning flowing patterns. It is possible to master knots in just a few minutes. Practice makes your technique better quickly.
Begin by creating a simple wall hanging design. Make use of yarn that is colored or cotton rope. Dowels made of wood or branches can be used as hanging rods. Watch online tutorial videos step-by-step.
This DIY wall decor requires a bit of patience to get it right. However, the results are beautiful and unique. Macrame works well in living and bedroom rooms with a perfect fit. The texture provides warm and welcoming emotions.
Recycled Material Projects
Recycling can save money and help the environment. Explore your home for decorative materials. The old items can be transformed into treasures when you are creative.
Cardboard Box Art
Create shapes using sturdy cardboard boxes. Cover them with decorative or fabric paper. Place geometric shapes on the canvas backing. This will create textured three-dimensional artwork easily.
Wine Cork Boards
Conserve wine corks, and join them. Create cork boards in different shapes. You can frame them or put them up on their own. This showcases your wine passion in a stylish manner.
Magazine Page Collages
Find interesting images in old magazines. Make collages of them or patterns. Put them on canvas and seal by using decoupage glue. This makes colorful and unique art pieces.
Tips for Successful DIY Wall Decoration
Begin with easy projects before moving on to more complicated ones. Develop your confidence and abilities slowly. Don’t let yourself be discouraged by your early mistakes.
Take measurements of your wall space prior to creating decorations. Determine the exact size of items you will need. Small pieces look sloppy, while large pieces overwhelm spaces.
Make sure you use the right hanging hardware for your project. Larger items require wall anchors always. Lightweight pieces can be used with regular nails, which are very fine. Command strips stop wall destruction completely.
Conclusion
DIY wall decorations offer unlimited creative possibilities for today. You can make any room look amazing without breaking your budget. Begin with a simple project this weekend. Find the basic materials you already have. Use the easy tips provided in this tutorial. Do not stress about making everything perfect at first. Handmade beauty is a result of slight imperfections, naturally. Each piece adds character and warmth to your home. Walls will be a reflection of your personal style in full. Family and friends will appreciate your talents and creativity. In the end, you’ll be happy with the work you’ve made. Do not stare at your empty walls. Begin the first DIY wall decor project today. You’ll be amazed at the things you can create.
FAQs
Q Do I need any creative skills to make a DIY wall decor?
The majority of tasks are easy and suitable for those who are new to the field.
Q: What will a DIY wall decor usually cost?
The majority of projects are under $20. Many projects make use of recycled or free materials.
Q: Can renters do DIY wall decoration safely?
Yes, you should use hanging methods such as command strips to prevent wall injury.
Q What is the time frame for DIY wall decor projects take?
Simple projects can take anywhere from 30 minutes to two hours, depending on the details and complexity.
Q Where can I get materials for decorating my walls?
Craft stores, dollar retailers, thrift shops and even your own home will have everything you require.